Friday, June 29, 2012

Another Eyeglass Case

Getting the pattern right for the clasp frame just kept bugging me. I even dreamt that I was redrawing it, making complicated calculations, using some really weird measuring tools...LOL
So I had to make another one, this time a little bit wider at the hinges of the clasp frame.


It does look better than the previous one, but I still feel like I am missing something. Probably something so obvious, that I'm going to have a good laugh when I finally get it...


 Other than the hinge issue, I really like this case too, so now I'm going to have to toss a coin to "decide" which one to keep for myself :)


Have a fun weekend, Everyone!


Tuesday, June 26, 2012

Fairy Tales

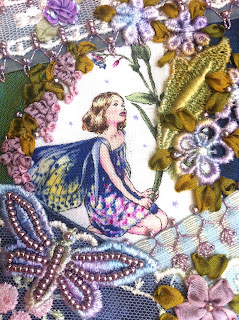
After finishing up the flower fairy phone pouch (tried several threads to outline the butterfly, but as none of them seemed right, in the end decided to just leave it as it was),


I had a go at attaching my first clasp frame to an eyeglass case I've pieced and embellished a couple of days ago.


I really love how it turned out, except I should have made my pattern a little bit wider... Oh, well... the next one will be better :) 


How cute are those little fairies reading their fairy tales book?!

Hope you are all having a wonderful day!

Monday, June 25, 2012

Summer Break Is On!

Less time for stitching, but ...

Oh, so much more time for being together and having loads of fun,


going on adventures and making new friends,


having as many "sweet treats" as we can eat,


and also stitching a little bit during nap time :)


My latest flower fairy phone pouch in progress - it still needs a couple of finishing touches here and there, like a darker highlight around the lace butterfly... 


Have a wonderful week, Everyone!


Friday, June 22, 2012

Tone on Tone DYB

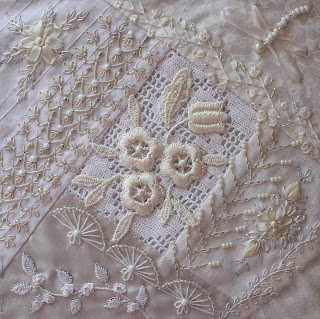
Last, but not least in this DYB it was the turn of Ati's block for me to work on. She pieced lovely white-off white blocks, each with a vintage piece of crochet lace or cutwork embroidery in the center and we were to use white, off white and silver embellishments.


Have a beautiful day, Everyone!


PS: I know I promised you the tutorial for the rosebud and leaves to be my next post, but I have been having a hard time taking good photos - and believe you me, I have been trying - so consider this post the one before the next and be sure that the tutorial will be posted too, as soon as I can take usable photos.

Thursday, June 14, 2012

Stem Stitch Rose with Knotted Center - Tutorial

Today's stitching time was spent playing with a couple of stitches in the company of one of my favorite embroidery books and my doodle cloth. 
The book is written in Japanese, so I can't make out a word from the instructions, but the photos and diagrams are almost sufficient to understand the stitches. Almost. To make out the rest of the "secrets", there's always the doodle cloth :)

There was a cute little flower in the book, starting with some sort of a knot (if you know its proper name, please drop me a note, thank you) that I wanted to try out. Loved the way it turned out, added a few stem stitches to it, and there it was, a lovely, delicate rose, stitched with 6 strands of pink variegated DMC stranded cotton:


To stitch this rose first imagine (ha!) a small square, as marked on the photo below. 
Bring your needle up in 1 and take it down in 2.


Come up in 3, and you will get a small straight stitch:


The next stitch will not go through the fabric, but under the straight stitch: bring your working thread down over the straight stitch and slide your needle under the straight stitch, pulling to the left of your working thread.


Then slide your needle under the straight stitch again, over the working thread, pull your thread through to form a knot


and take your needle down in 4 (the upper right corner of our imaginary square).


Now you have a lovely knot, which can stand by itself as a small flower, for instance, or as a filling stitch along with French and colonial knots.


Or you can take it forward, by bringing your needle up between 3 and 4 (the center of the top line)


And making loops by sliding the needle under the little "legs" of the knot and over the working thread (just like stem stitching except not through the fabric) weaving all around the four "legs"


When you have woven the fourth leg, you could take your needle down again in the center of the upper line, (just where you came up to make the loops) and you would have a smaller rose,


or you could make a bigger rose, by adding more petals - stem stitching around your rose until it gets to the desired size:


When you have enough petals, finish your rose by bringing your needle down to the back of the fabric at an angle as shown in the photo below


and start making another rose


and then another one...


Isn't this fun?!


Oops, maybe I got a little carried away LOL

In the next post I'll show you how I stitched little rose buds, starting with the same knot as the rose and some cute leaves, too. 

Hope you are having a fun day, Everyone!


Wednesday, June 13, 2012

Wings for Doves, Rush, Rush, Rush - Edited

My daughter and two of her classmates are going to be doves in today's school play. A new play, a new costume challenge. Three, actually, as I volunteered to make all three sets of wings.
So it happened that I had a little less than six hours to figure out the "how to" and make them happen. No time for searching the www for ideas, no time for shopping, just a quick stash raid, a cup of strong coffee to awaken my muse and rush, rush, rush.
Luckily I had plenty of white cotton fabric (the kind used for sheets) and batting scraps, some bigger, some smaller... Well, I thought, that will have to do, let's see what happens.
As all the girls are more or less the same size, I took one of my daughter's sweaters, measured a full arm length (abt. 100cm) and a back length (abt. 60cm), and cut a 100x120cm piece of white cotton.
First I folded it on the length (100x60cm) then on the width (50x60) and with a pencil I made a free hand sketch of a wing and half of a tail directly on the folded fabric:

As I wanted two rows of feather (more actually, but I only had time for two), I also traced two arches:

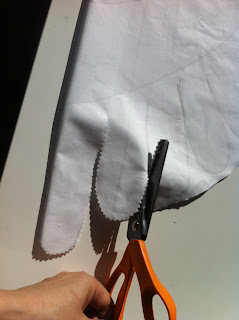
 Then cut around them, through all four layers of cotton with zigzag scissors:

Here are the open wings (two layers of cotton, folded on top): 


After sewing along the bigger arch, the batting came in handy to make the feathers a little fluffier. I pinned each two layers of feathers, placed them over the pieces of batting, pinning along, adding more pieces of batting, until all the feathers had a complete layer of batting under them and then simply cut the batting around the feathers.


and trimmed along the sewn arch (you can see in the photo below that only for this portion I used four pieces of batting scraps):

The next step was to insert the batting between the two layers of cotton fabric, so I took out the pins, and started tucking, sandwiching and pinning again:


All the feathers being stuffed and pinned, I turned to my sewing machine again and asked her kindly to try and behave this time, and zig-zag stitched along the outline of the feathers, about 0.5-1cm from the edges  (no, I still can't sew straight...)


And the first layer of feathers was done:
At this point I relaxed, because the project did start to look like wings, to me at least...
Time to make a second layer of feathers. Taking the piece of cotton that fell off after cutting the wings (it was still as I folded it in four at the beginning), I placed one of the four layers of fabric over the sewn wing (folded in two on the width) and, guided by the smaller arch and the feathers already made, again, just drew feathers with my pencil, then put that layer back on the other three and cut again through the four layers with zigzag scissors.


So now I had the pieces of a second row of feathers for both wings:


It was time again to make sandwiches: one layer of cotton, one layer of batting scraps and another layer of cotton, and zig-zag them together, just like before. Here's one side sewn and pinned to the wing:


When both sides of the second row of feathers were sewn, they got attached to the wing by - guess what - zig-zag stitching along the arch. This is the moment when the first row of feathers might get caught under and stitched over... Ask me how I know!
Then I sew an eyeballed size double fabric strip to the upper part of the wing, for supporting the elastic bands sewn on for shoulders, above elbows and wrists.


And voilá, the first set of wings was done in exactly two hours! On to the other two I was, and finished them on time, too.


As you can see, there was a lot of not so straight stitching, fabric gathering and such going on, but let's just agree that all of these add extra fluffiness to the wings, ok? :)
The girls are really happy with their wings, I'll take photos of the three little doves during the play and will add to this post.

Edit:


Have a beautiful day, Everyone!

Related Posts Plugin for WordPress, Blogger...